Passes are a system of selling customers access to certain parts of your retail or attractions ahead of time with or without restrictions applied. Passes have the added ability to be used on multiple items if they are configured to and can also be mapped for use in multiple locations when multi-site is enabled .
There are two components to passes, the Pass Type, and the Pass Inventory Item. The Pass Type is what sets the parameters for the customer, including what they get with a pass, how often and when they can use it etc. The Pass Item is the physical item you sell the customer (although there doesn't necessarily need to be any physical media associated with a Pass Item if it is attached to a customer record.) The Pass Item will have the settings for the purchase price, the official name of the pass, and other typical inventory item configurations. This item has a setting to associate it with a Pass Type or Types, so all the configurations for using the pass are attached to the item. You have to choose the pass benefits and restrictions by creating a Pass Type before you can create the item to associate with it, but you can go back and alter the Pass Type at any time, even if it is already associated with a Pass Inventory Item.
Create a Pass Type- From Manager Console, click Customers.
- Double-click Pass Types.
- Click Add to create a new Pass Type, or click Edit with an existing one selected to make changes.
- Configure the following tabs as necessary.
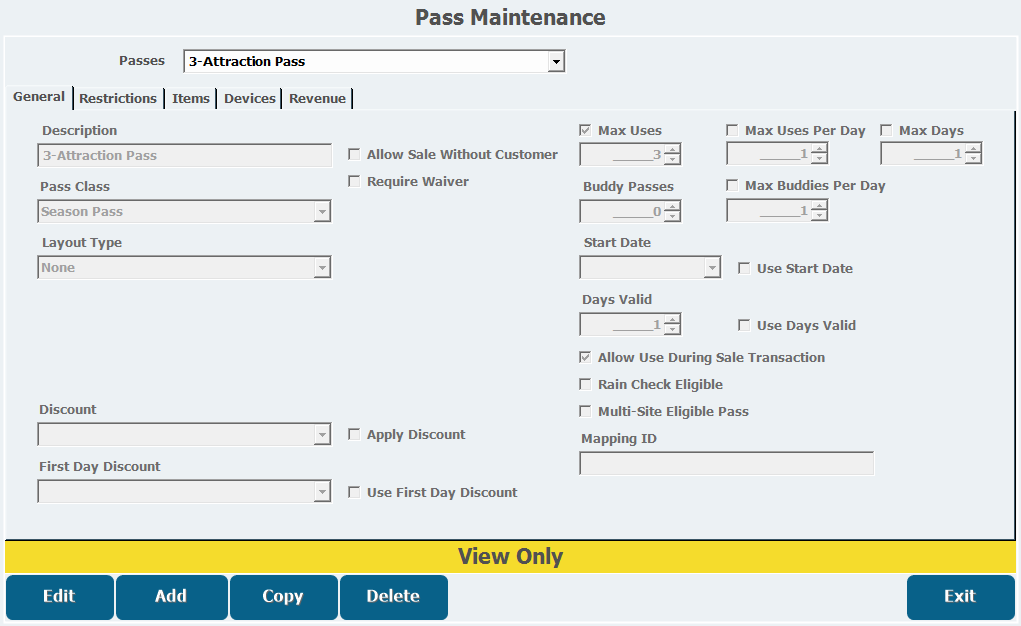
The first tab in Pass Maintenance is the General tab. This tab has options for the most basic features of a pass type.
Description: This field is where you type the name of your Pass Type.
Pass Class: This currently has Season Pass or Non-Season Pass as options and the selection here doesn't change the function of the pass.
Layout Type: This pull-down list has five options for how the physical Pass Item will appear and function when this Pass Type is attached to it.
- None: This is the default Layout Type and does not have a physical pass associated with it. The Pass Item will only exist in the customer's account.
- Card (No Swipe): This prints a card for the customer and attaches the pass to their record, but swiping the card is not necessary to use it. Selecting this type reveals the option to Require a Picture to Print on the card and a Layout pull-down list that lets you select a layout for your card.
- Card (With Swipe): This prints a card that can be swiped to use the pass. This option reveals a checkbox giving you the option to print your own card or use a preexisting one. If you select Print Card, the options to Require Picture to Print and to choose a Layout also appear.
- Card Only (No Customer): This greys out the Print Card option and no other options appear.
- Ticket: This prints a ticket that can be used as the pass and reveals a Layout pull-down list where you can choose a ticket layout to use for the pass.
Discount: This pull-down list, allows you to choose a discount if the pass will be good for a preexisting discount rather than a price determined in Pass Maintenance. This list only becomes active if the Apply Discount checkbox is selected.
First Day Discount: This pull-down list allows you to choose a discount that will be good for the first day of pass use. This list only becomes active if the Use First Day Discount checkbox is selected.
Allow Sale Without Customer: This checkbox allows the sale of the pass without being tied to a customer. This makes certain Layout Types obsolete, such as Card (No Swipe), although they can still be selected. An error will occur.
Max Uses: This checkbox, when selected, allows you to enter a maximum number of times the pass can be used in total.
Max Uses Per Day: This checkbox, when selected, allows you to enter the maximum number of times the pass can be used in one day.
Max Days: This checkbox, when selected, allows you to enter the maximum number of days a pass can be used.
Buddy Passes: This field allows you to enter a number of buddy passes, or passes good for another individual, that are associated with the pass.
Max Buddies Per Day: When selected, this checkbox allows you to enter the maximum number of buddy passes a customer can use in one day.
Use Start Date: This checkbox activates the Start Date pull-down, which allows you to select the date the pass becomes active.
Use End Date: This checkbox activates the End Date pull-down menu, which allows you to select the date your pass expires.
Allow Use During Sale Transaction: This checkbox allows you to use the pass if an eligible item is being sold in the same transaction as the pass itself.
Rain Check Eligible: This checkbox allows you to add uses back onto a pass if unforeseen circumstances prevent proper use of the pass.
Multi-Site Eligible Pass: This checkbox makes the pass eligible for use at different locations, although this use is limited to a small number of locations and the passes can't be tied to customers.
Restrictions Tab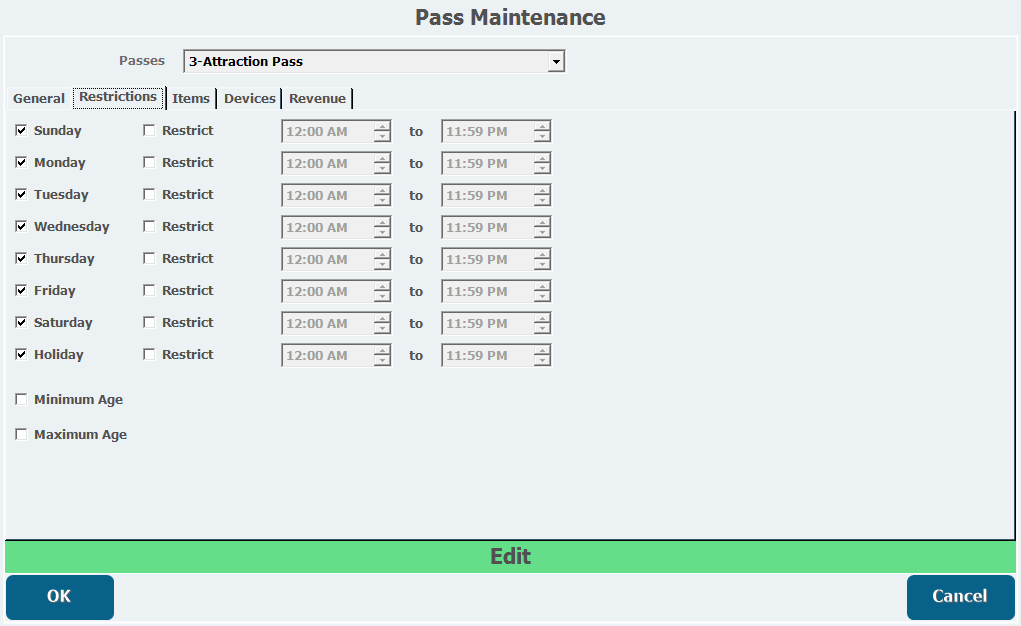
This tab has a list of the days of the week and a Holiday selection, which are all selected by default. All selected days are days on which the pass can be used. Deselecting a day will make the pass ineligible for use on that day.
This tab also has a list of checkboxes labelled Restrict, which are deselected by default. Selecting a Restrict box will activate the time fields next to each day. You can then select the times of day customers can use the pass and they will be unable to use it outside of those hours on that day.
Minimum Age and Maximum Age are checkboxes that let you enter a minimum or maximum age a person has to be to use the pass.
Items Tab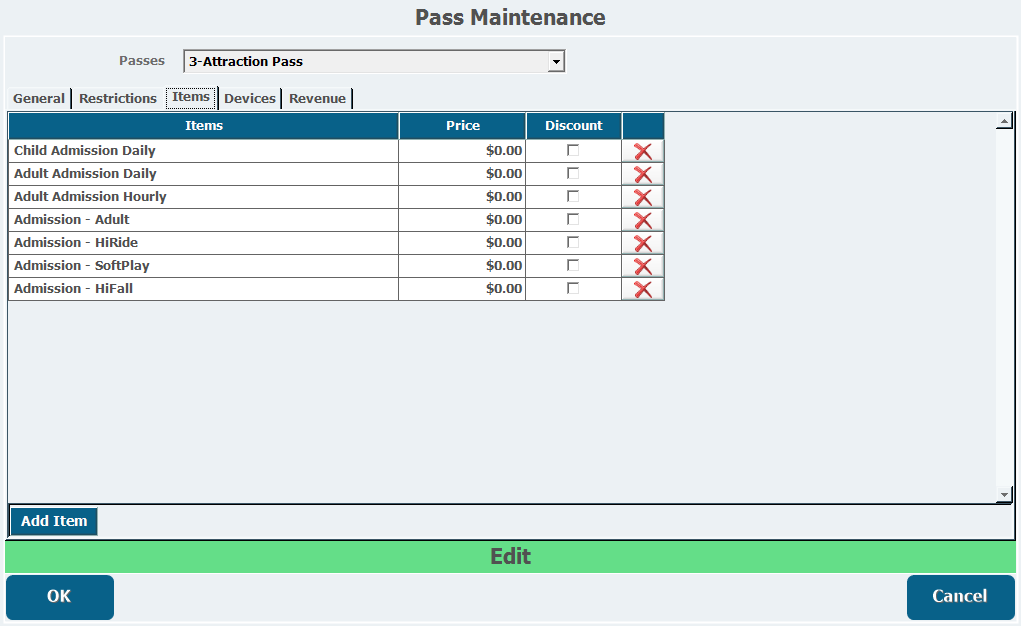
The Items tab allows you to add inventory items your pass will be good for.
- Click Add Item to generate a new line in the field above.
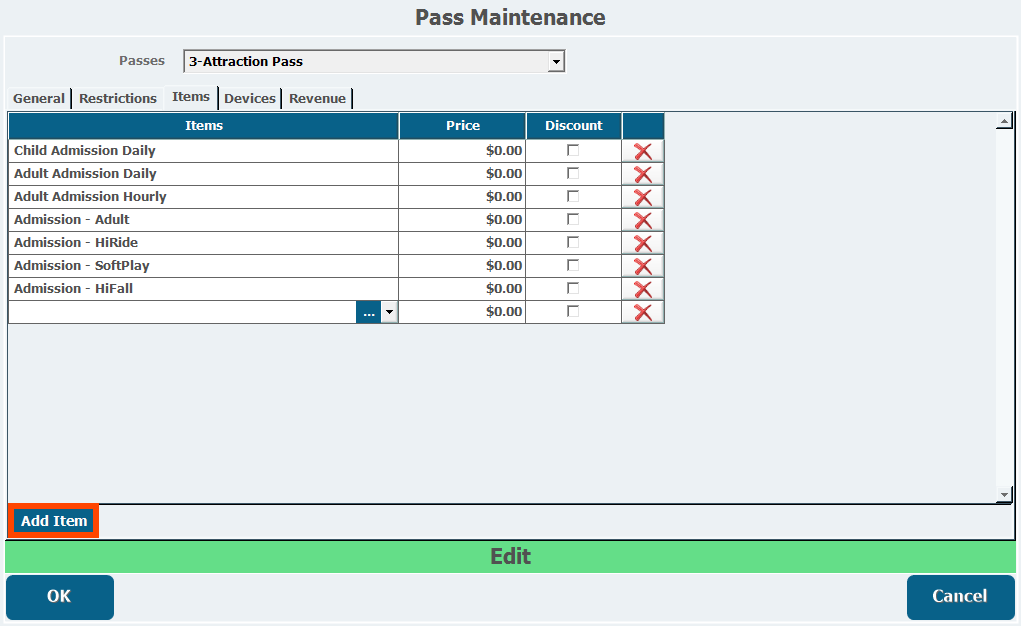
- Select or search for the item you want to include in the pass.
- Configure the Price and Discount fields if necessary.
- By default, all items are $0.00 with the Discount checkbox deselected. If the Discount box is deselected, the Price field contains the dollar amount a customer has to pay for the item when using the pass. If Discount is selected, the Price field contains the dollar amount that is discounted off the item price when the pass is used.
- Repeat this for any other items you want the pass to be used for.
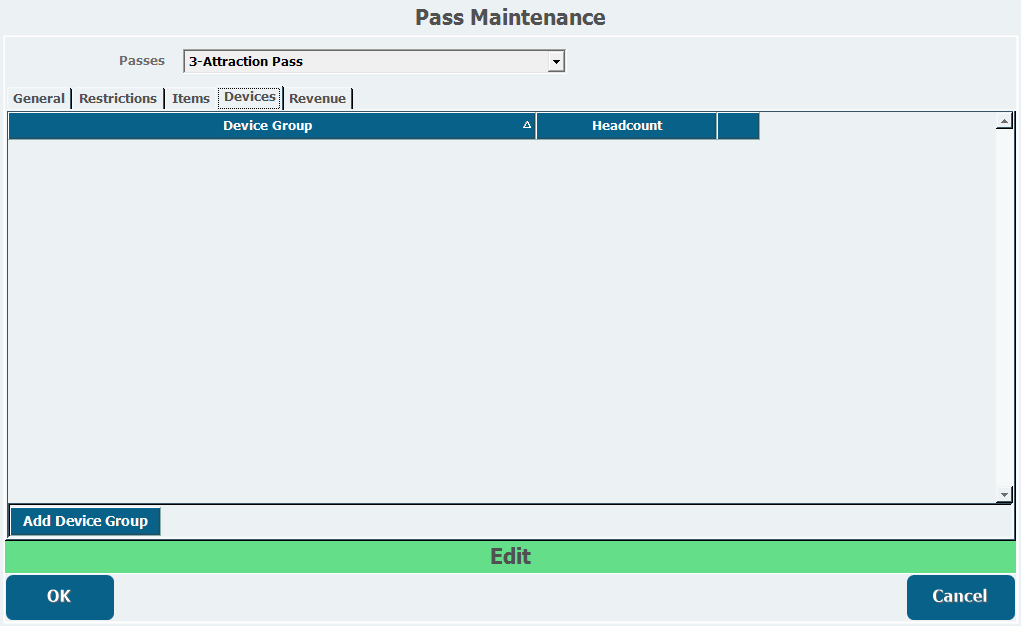
The Devices tab allows you to add devices a customer can use their pass on. Clicking Add Device Group lets you choose a Device Group. This activates the Headcount column, which lets you choose from a pull-down list with the following options.
- None: means no headcount will be recorded when the pass is used at a device.
- First Use of Every Day: means a headcount will only be recorded the first time a customer uses the pass on a device in a given day.
- Every Use: means a headcount will be recorded every time a customer uses their pass on a device.
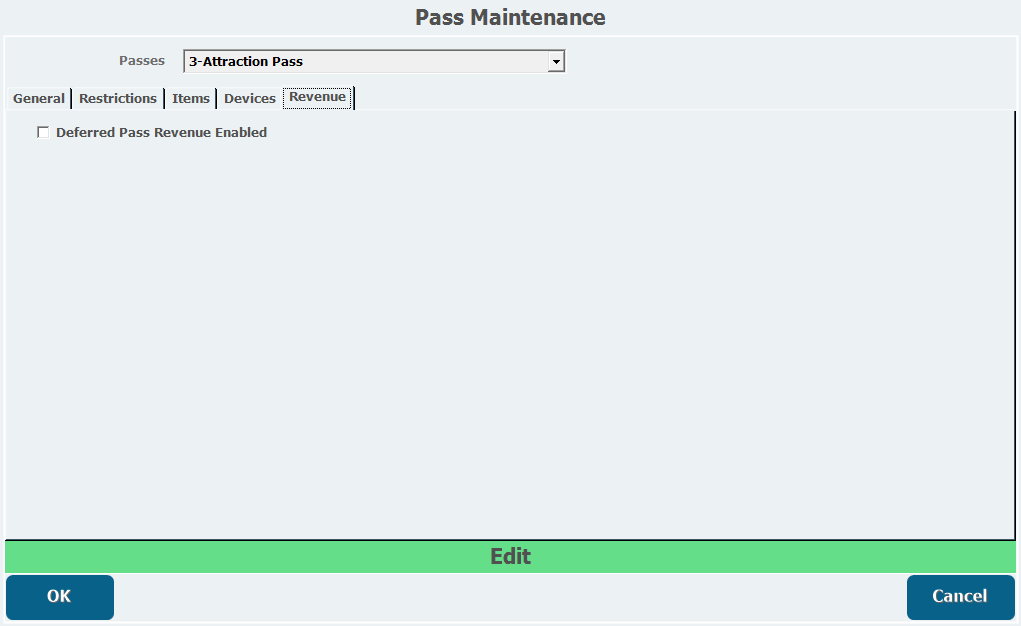
This tab has a checkbox labelled Deferred Pass Revenue Enabled. Selecting this box, if this Pass Type has not already been sold, will bring up a warning that says, "Please note if you enable a pass type to use deferred revenue then you cannot enable it to be multi-site eligible." If you have sold a pass of this type, you can't change its Deferred Revenue status and will get an error if you try.
The Pass Item is the actual item in your inventory you will attach a Pass Type to.
- From Inventory Item Maintenance, click Add to create a new item.
- Enter a Description and select a Category and Subcategory, which are required fields for every inventory item.
- Select Pass as the Type of Item.

- Select the Pass Type you created above to attach it to the item.
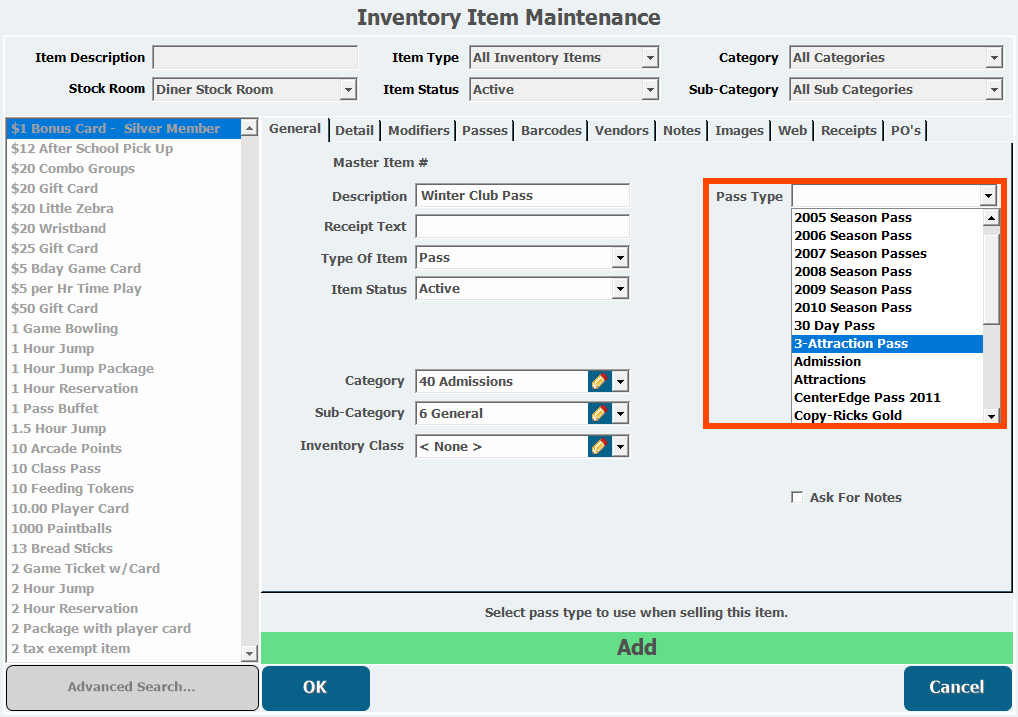
- Configure the Detail tab as necessary, including the Retail Price to purchase the pass and whether the item is Taxable.
- Open the Passes tab.
- Select Sell as Will Call at POS if you want to sell it as a will call ticket that must be redeemed later.
- This is useful if you want to ring customers up quickly and collect their information later.
- Select a Will Call Ticket Format.
- Add any Additional Pass types you want to include in the sale of this item by clicking Add Pass.
- If you click Add Pass, select the Pass Type you want to include.
- Enter the quantity of that Pass Type that will be included with this item.
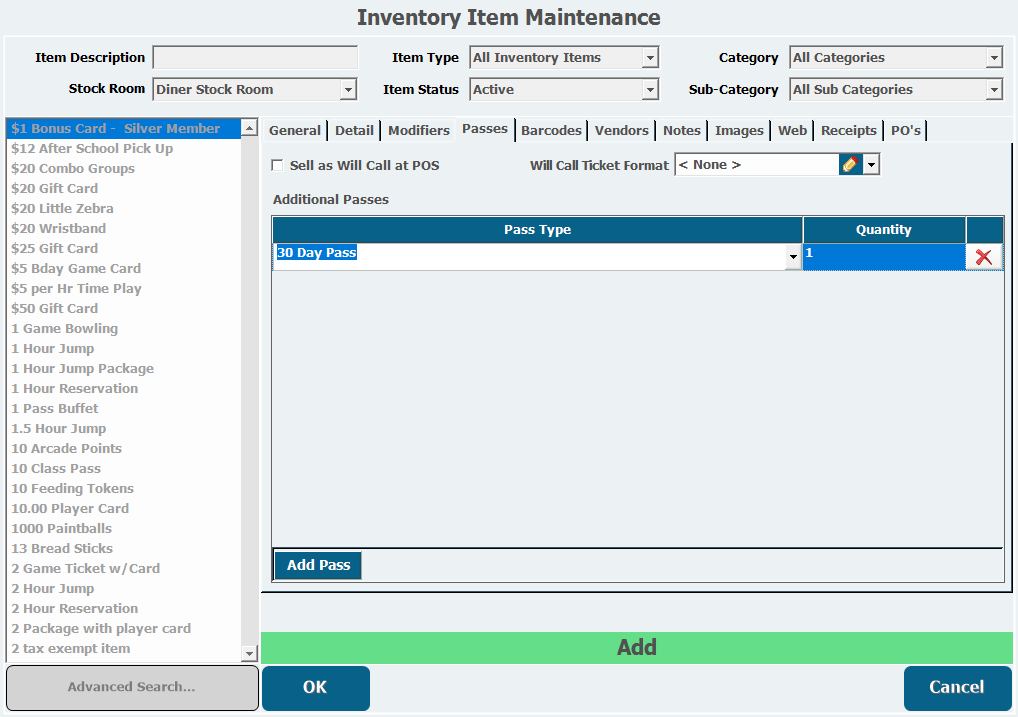
- Add as many additional Pass Types as necessary.
- Configure any other inventory item settings if needed.
- Click OK.
When you have finished creating the Pass Item, create a Sale Button in the POS in order to sell it. You will ring this pass up normally and, depending on the Layout Type you configured above, you may be prompted to search for or add a customer, swipe a card, or take a picture. You can make passes renewable by adding them to a Membership and charging the customer on a regular basis either manually or as an auto renewal.